One Button Studio
Overview
For Students, Faculty, Staff
Introducing our revolutionary One-Button Studio recording solution (OBS)! Effortlessly record high-quality videos in our brand-new state-of-the-art studio.
With just one touch, unleash your creativity and capture professional-quality audio and video content. Whether you’re a complete novice or an experienced podcaster, musician, educator, or content creator, our One-Button Studio simplifies the recording process, allowing you to focus on what you do best – creating amazing content. It is perfect for recording or annotating instructional videos, presentations, welcome messages, or training videos. Take advantage of the One-Button Studio at the Learning & Innovation Technology Environment (LITE).
The OBS is a self-facilitating complete studio package pre-equipped with a 45″ lightboard, microphone, camera, and lighting to help you create a professional-grade video without any prior production experience! All components are integrated into a single height-adjustable workstation.
Unlock your potential with the power of simplicity. Try our One-Button Studio solution today! For a preview or more information - visit us at the LITE Center at Rose Hill, located on the ground level of Walsh Library. You can also email us for an appointment.
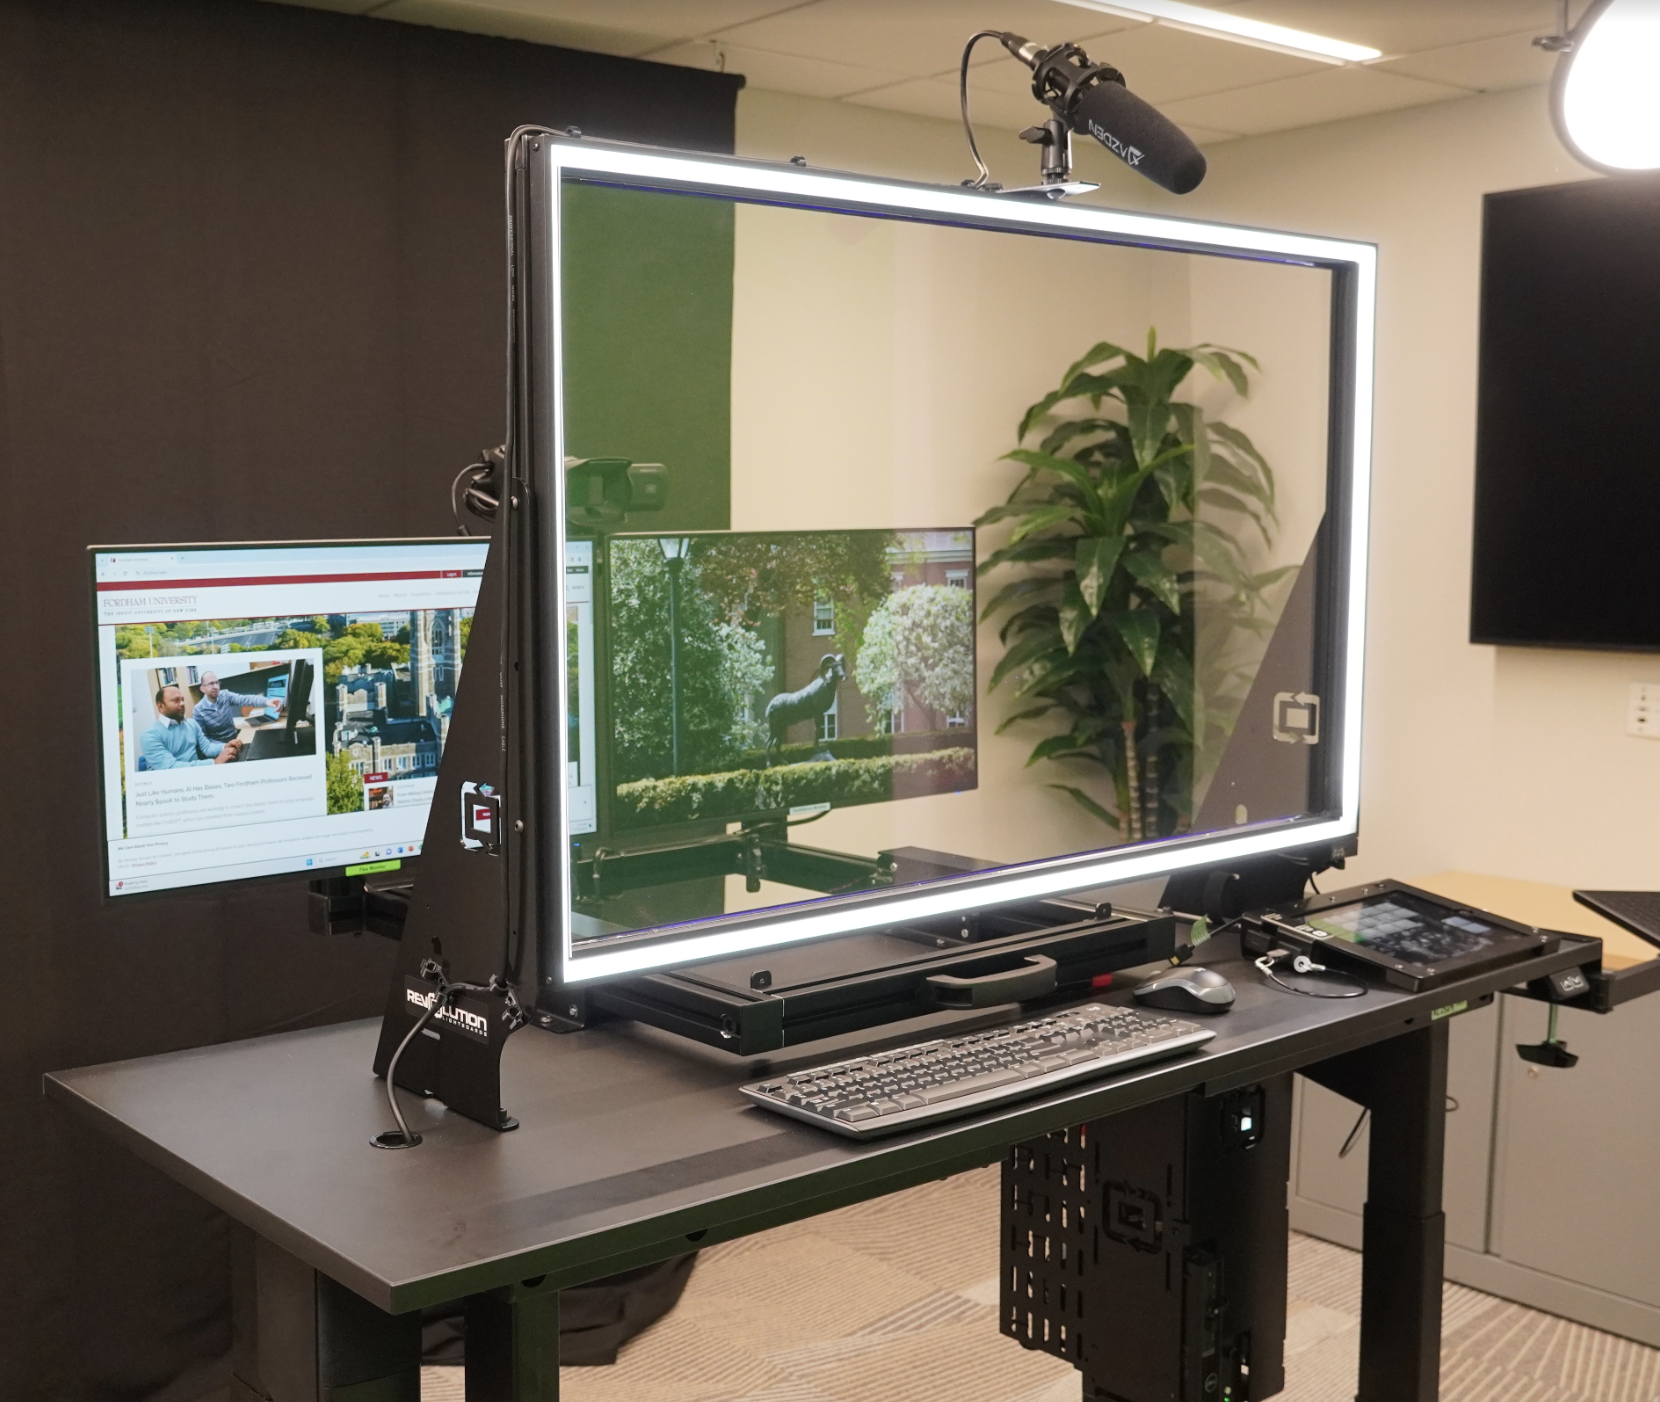
Capabilities
- Single button recording
- Glass passthrough writing surface
- Built-in microphone, camera, and PC
- Single file with all streams embedded for easy sharing
- Studio lighting
- Green screen for custom backgrounds
Getting Started
The Basics
- Turn on the One Button Studio using the white control puck.
- Insert the included USB-C flash drive into the port labeled Record USB.
- Press the white circle Record button on the iPad when ready to record.
- When done, press the Stop button next to Record on the iPad.
- Transfer the USB-C flash drive to the port labeled Computer USB.
- Log into the PC with your Fordham credentials.
- Log into your Fordham-provided Google Drive or Microsoft OneDrive.
- Drag the file from the USB-C flash drive to one of the above services. Done!
You can alternatively provide your own flash drive and take the recording files with you, omitting steps 5 - 8. An adapter is included on the table to convert USB to USB-C. The file will be in the MP4 format.
Add Whiteboarding
- Drag the black felt curtain across the rail behind you for best results.
- Use the included neon markers to write on the glass whiteboard.
- Erase your writing using the included microfiber towels.
Add Computer Content
- Log into the PC using your Fordham credentials.
- Drag the content you’d like to record to the right Confidence monitor.
- Press the Studio PC button on the iPad in the Background control section.
Add Laptop Content
- Plug your laptop in using the HDMI connector on the right side of the table.
- Press the Laptop button on the iPad in the Background control section.
Change the Background Picture
- Select the Picture button on the iPad in the Background control section.
- Drag up on the iPad to display the photo selection area.
- Press the left or right arrows on the screen to scroll through the available backgrounds.
Add a PowerPoint
- Bring your PowerPoint on a flash drive or access it from the built-in computer in a browser.
- Open the PowerPoint in Office on the built-in PC.
- Drag the PowerPoint window to the Confidence monitor.
- Press the Studio PC button on the iPad in the Background control section.
Best Practices
Avoid green clothing or patterns containing green.
- A green screen is used for background insertions, and green clothing may pass video through.
Avoid very dark clothing if using the light board function.
- You may blend into the black background.
Run a test recording.
- If it’s your first time using the One Button Studio, schedule a time in advance to start a test recording and test the various features available on the touch screen to get accustomed to the options available and how they look on the recorded file.
Have a script.
- Have a script prepared before arriving.
- Practicing your script beforehand allows for a more natural-sounding flow.
- A script will also make the recording easier and possibly shorter, as you will have already fully considered your points and will have a reference if needed.
FAQs
-
If you are using PowerPoint, Keynote, or any other media for making a presentation during a recording, it’s helpful to follow some general rules about font, color, and any photos you may be including. Keep slides as simple as possible, and avoid flashy transitions or animations unless necessary.
- Design your PPT to an all-black background.
- Use high-res images on your PowerPoint.
- Be sure to describe the images in your video, include captions, and follow accessibility guidelines.
-
There are two displays - a ‘flex’ display and a ‘confidence monitor’ display.
-
- The flex display shows the local PC built into the one-button studio. You can log into this PC using your usual Fordham login credentials, browse the web, or use Office and other desktop applications. This display will not be recorded and is intended to hold your notes or content you don’t want the viewer to see.
- The confidence display shows precisely what the one-button studio will record to the USB flash drive. The built-in PC has a second video output sent to this monitor.
- To record/show content here, drag the window you’d like to record from the left flex display to the right confidence display.
-
-
The one-button studio will treat full black backgrounds on PowerPoints or browsers as transparent and pass the camera signal through. This means that if you make your PowerPoint background black and the text or images white, red, blue, gray, etc., you will have floating text with your camera feed displaying. This allows you to point and write over the content without being obscured.
-
No software is needed to use the One Button Studio. It saves the video file as an industry-standard MP4 to a USB flash drive which can be uploaded to Panopto or Youtube, or shared directly to your viewers via file sharing services such as Google Drive or Microsoft OneDrive, both of which are available on the My Apps portal on fordham.edu.
-
We provide a USB-C flash drive tethered to the control panel for recording. You can also provide your own USB flash drive. You can transfer this file out of the One Button Studio via your Fordham-provided Google Drive or Microsoft OneDrive by visiting the portal and then dragging the file to the storage service you choose. You may also use your own laptop to copy the file from the built-in USB-C flash drive if so equipped.
-
While editing is not required, you may want to cut out sections of the recording or add additional content. We suggest the web-based app Panopto, offered free to all members of the University. It can ingest the file created by the One Button Studio and offers built-in editing capabilities. For more information about Panopto, please visit fordham.edu/panopto or contact the IT Service Desk at (718) 817-3999. IT Service Desk staff is also available at the LITE center’s front desk.
-
Using the handle below the glass writing board, push or pull the camera and displays away or towards you. Be sure you do not zoom out too far, or the green screen/black curtain will be out of frame.
Troubleshooting
-
- Press the On button located on the white puck to the right of the glass writing surface.
- Turn on the main room lights; the switch is located to the right of the glass room window inside of the room.
-
You cannot use white backgrounds to overlay content over the camera. Change the background of the PPT to all black, or use the green screen function to display it behind you instead.
-
The camera may need to be adjusted for focus. Please see a LITE staff member to assist.
-
Be sure to turn on the main room lights, located to the left of the door as you enter the space. The green screen keying function is calibrated for all lights being on, and will not work correctly with the lights off.
-
There is a brightness control knob on the right side of the glass board that allows for adjustment of the front illumination. You may wish to turn this down if you find the lighting overexposed.